🚀 Installation
Installing ZS Wishlist is quick and easy. Simply install the app from the Shopify App Store—no coding or developer assistance is required.
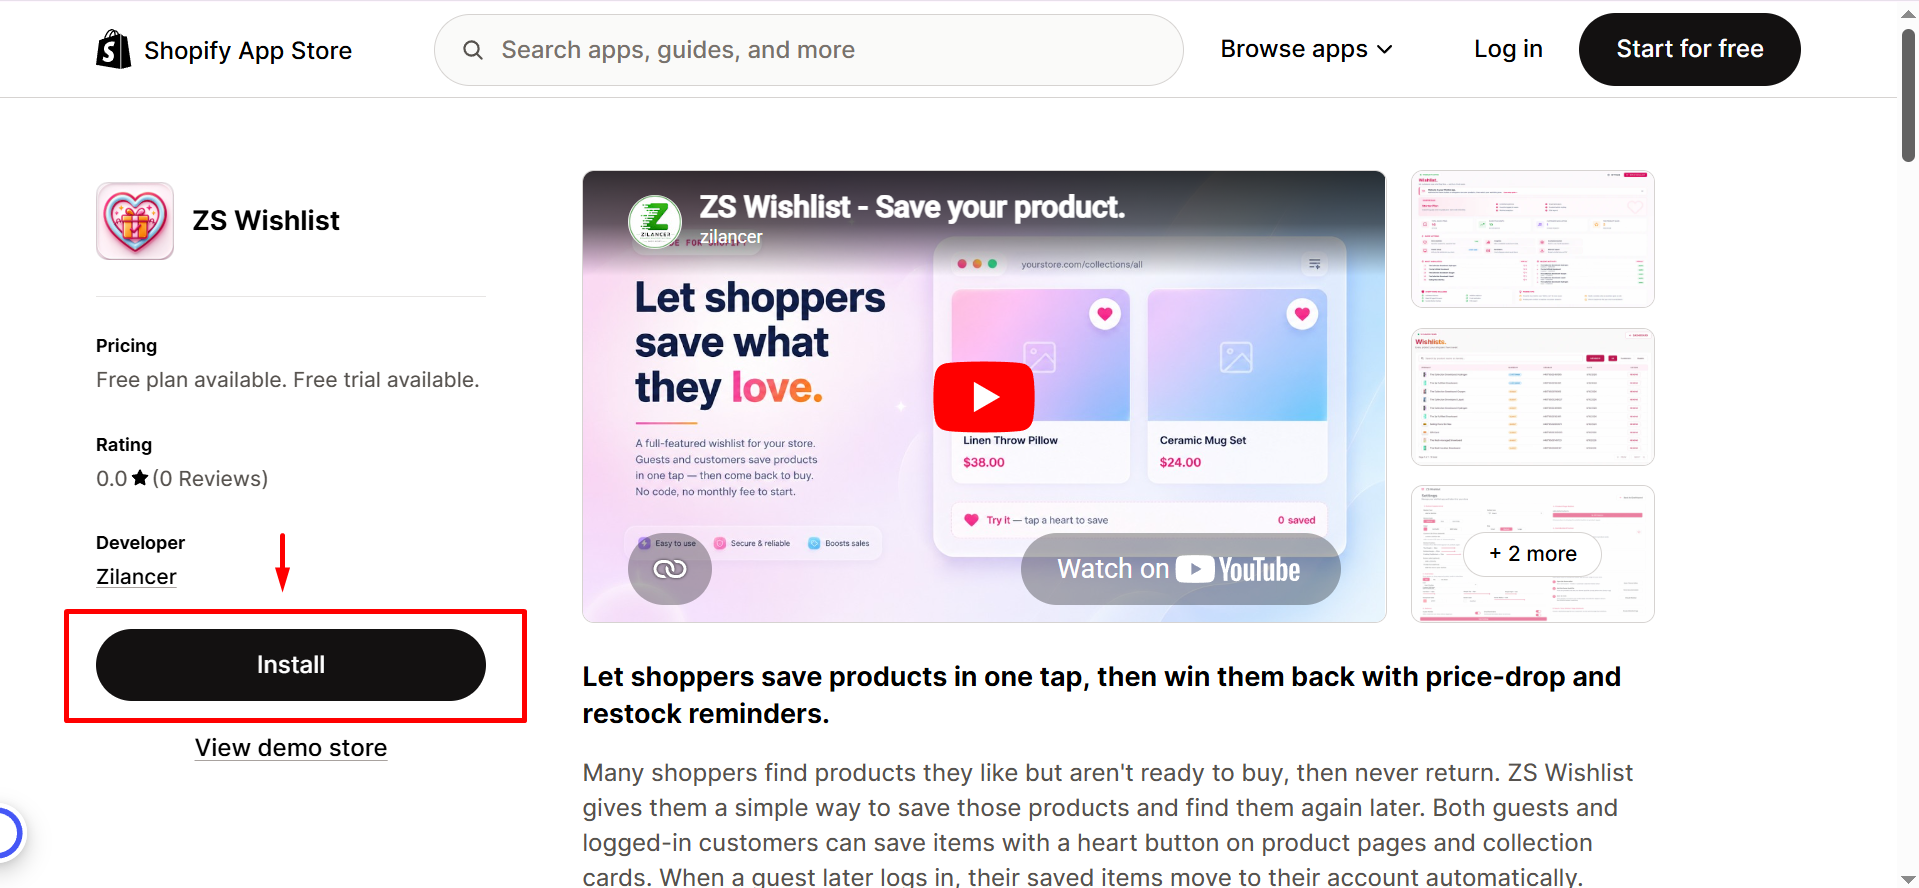
📥 Install the App
Click Install and approve the installation for your store.
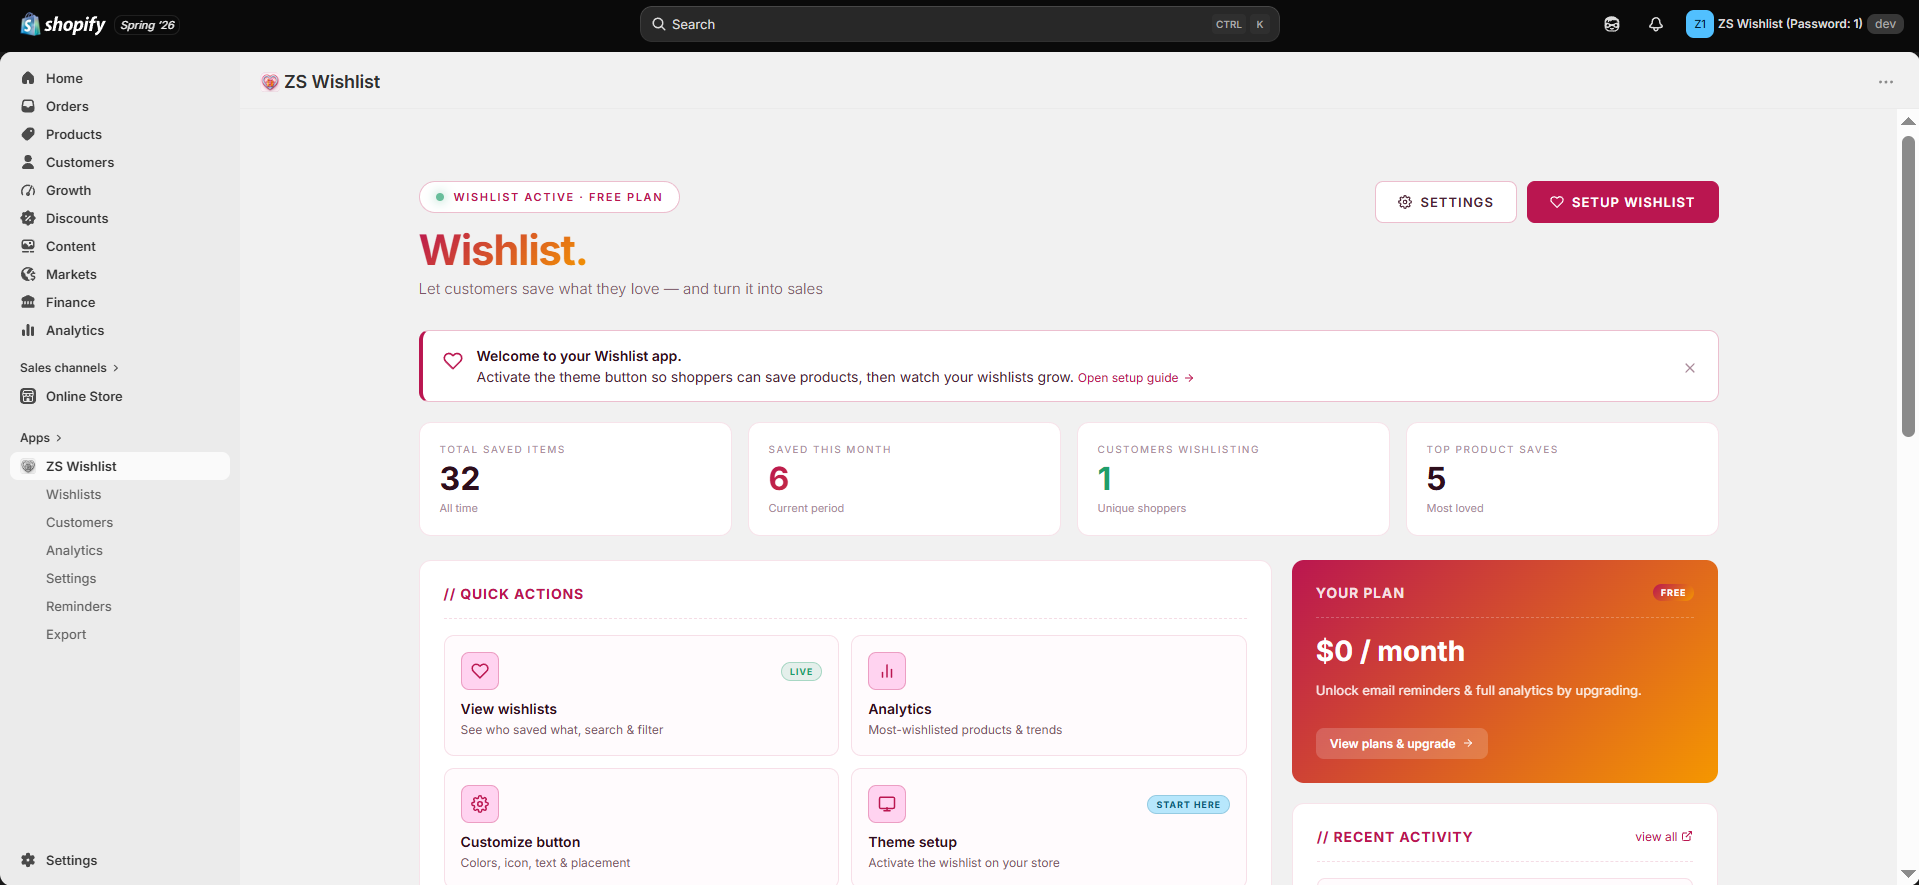
📊 Open the Dashboard
After installation, you'll be redirected to the ZS Wishlist Dashboard, where you can view saved items, top-performing products, and recent customer activity.
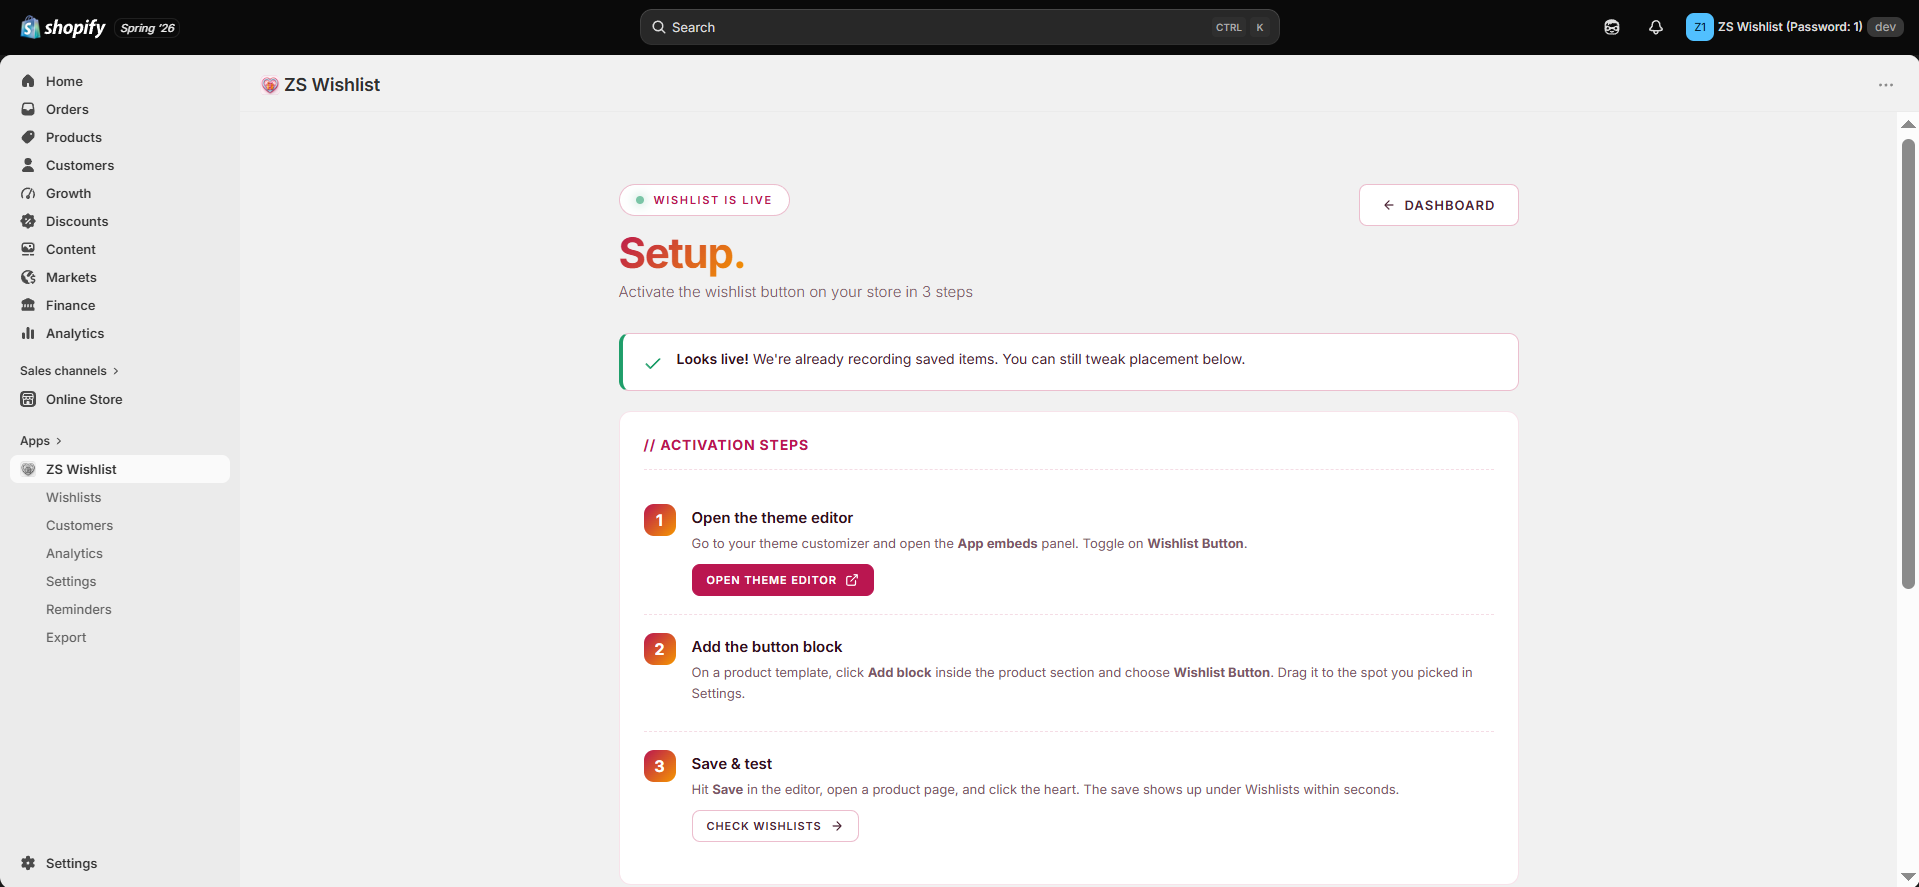
⚙️ Complete the Setup
Follow the in-app setup wizard, or use the instructions below to enable the wishlist button on your storefront.
🎨 Theme setup
Adding ZS Wishlist to your storefront takes just a few minutes. The app uses Shopify App Blocks, so it works seamlessly with all Shopify themes.
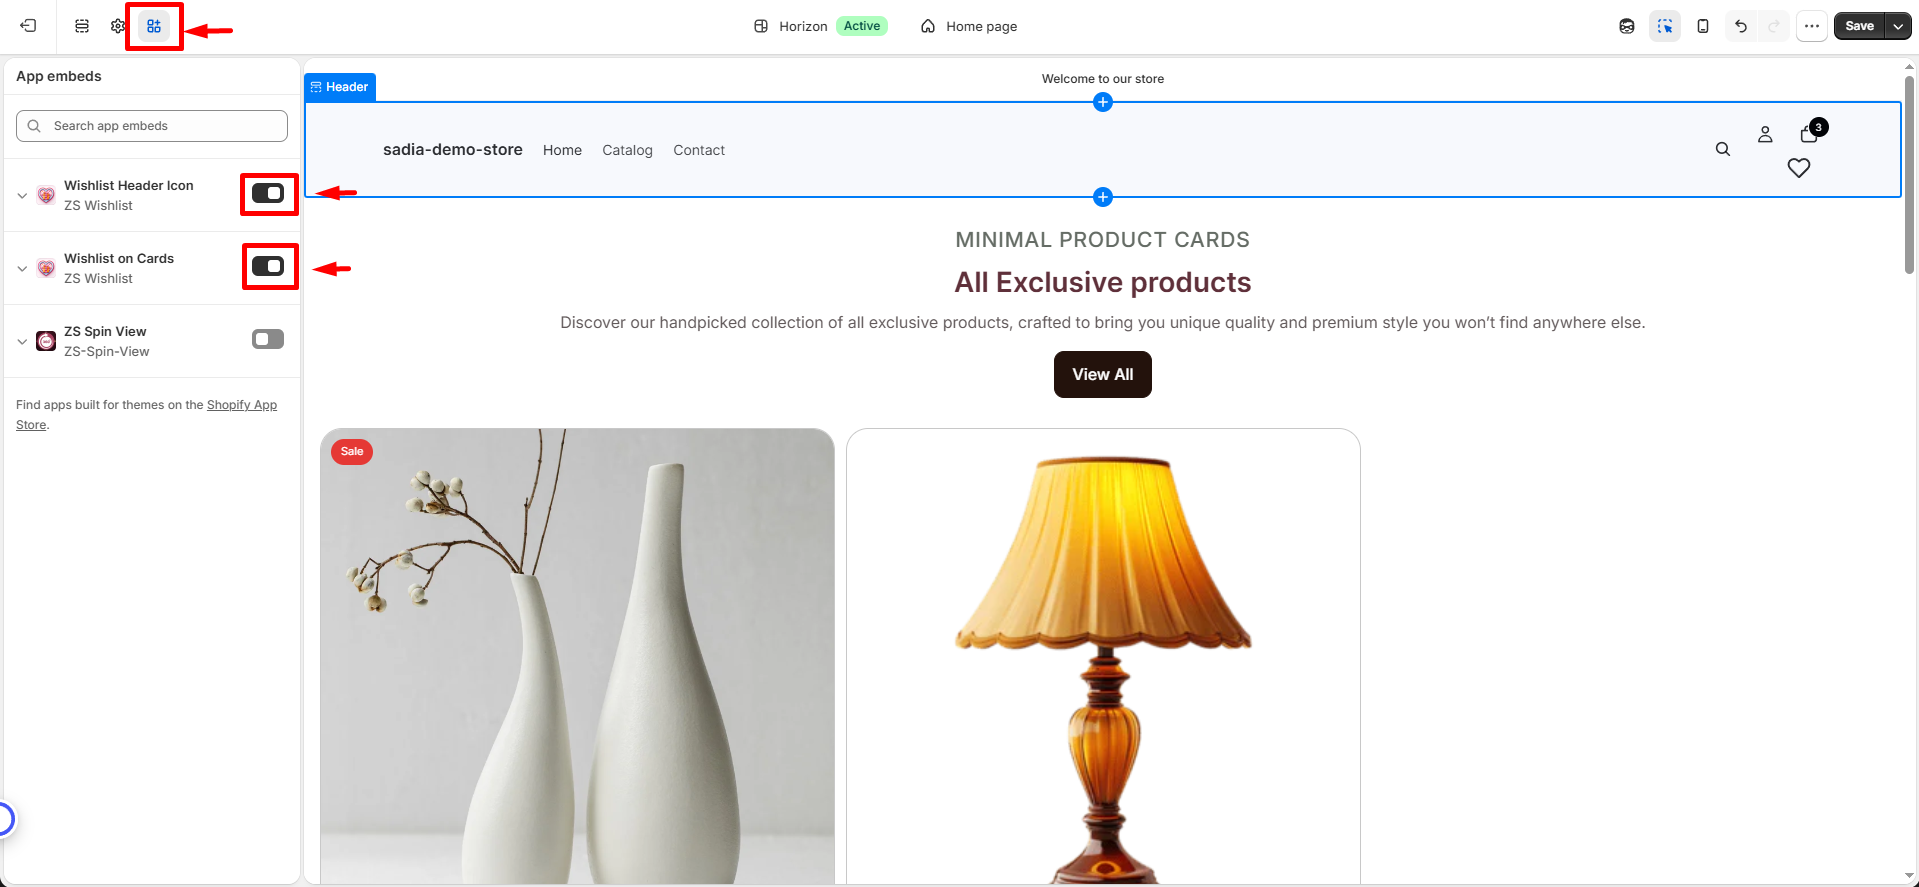
- 🛍️ Open the Theme Editor: From your Shopify Admin, go to Online Store → Themes → Customize.
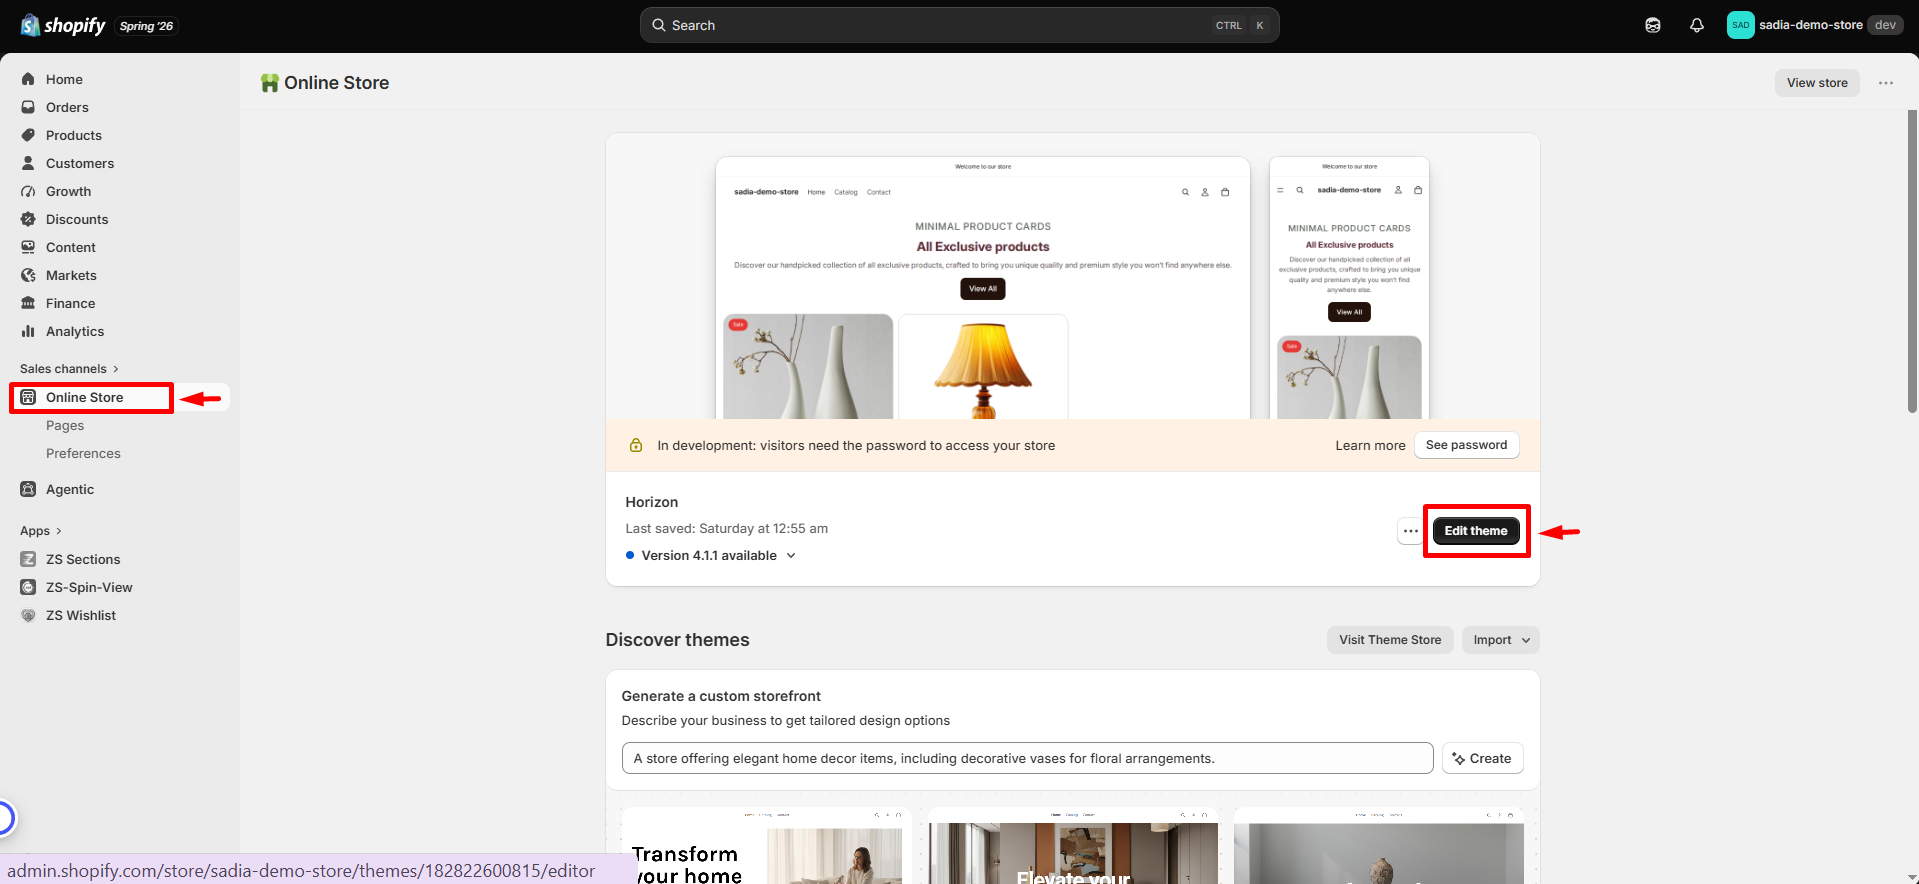
- ⚡ Enable App Embeds: Open the App embeds panel and turn on:
- ❤️ Wishlist Header Icon
- 🛒 Wishlist on Cards
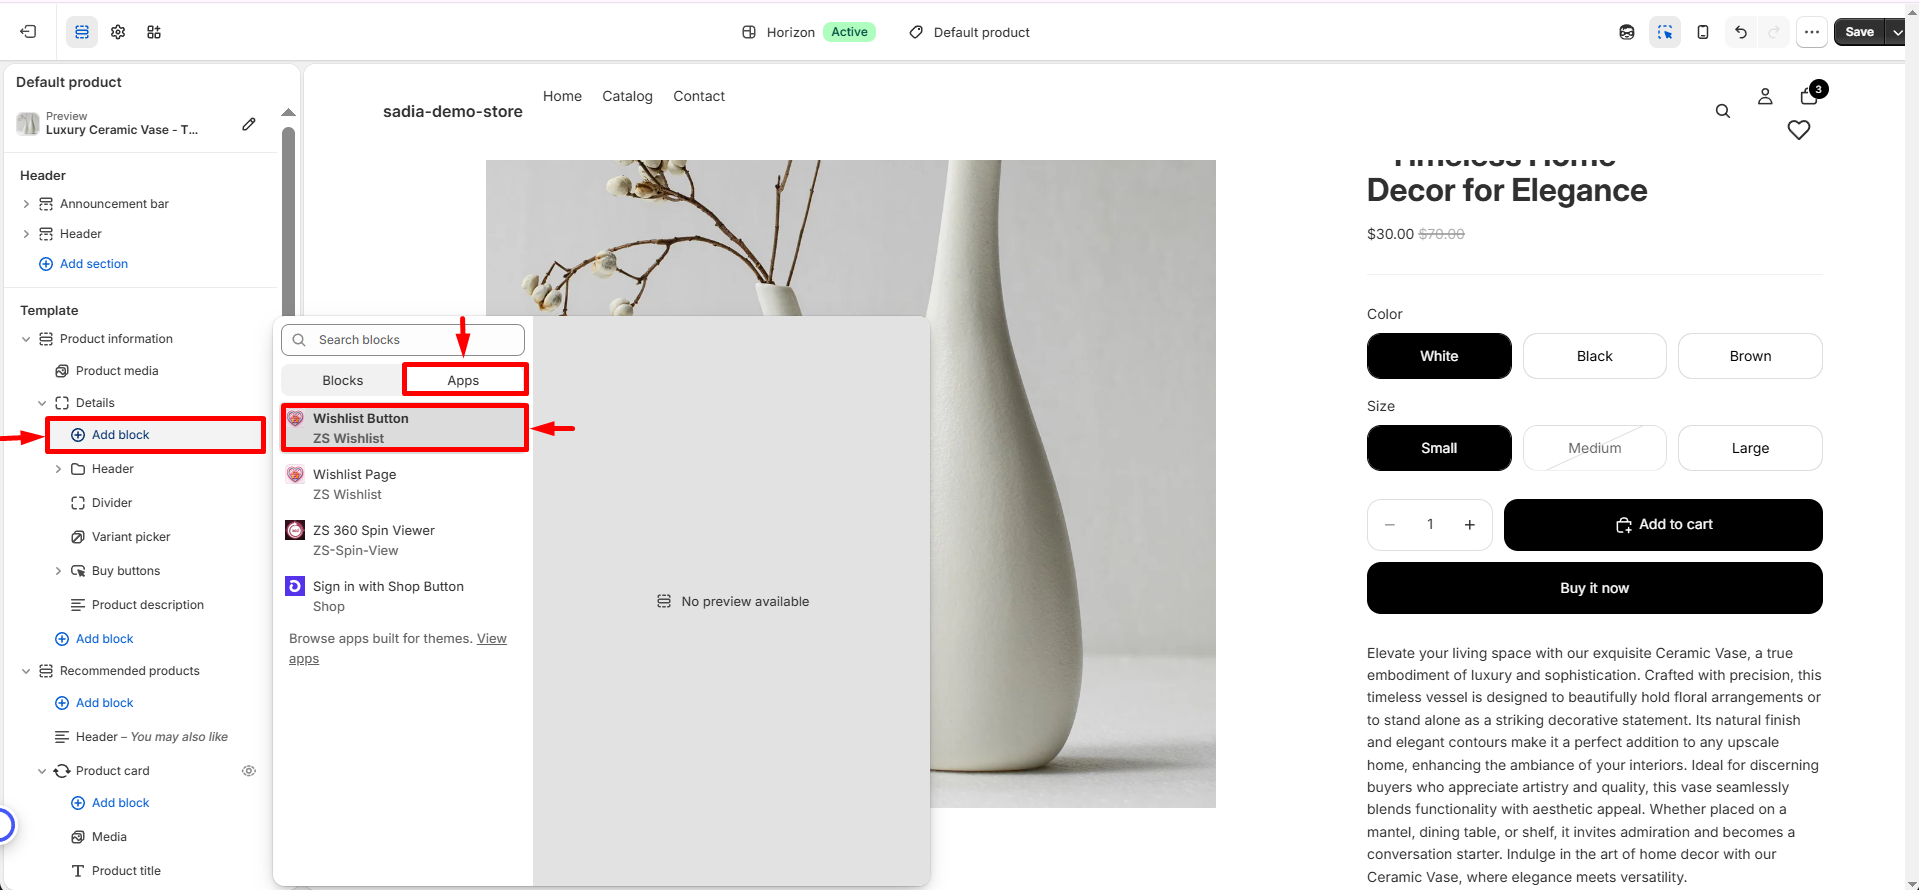
- ➕ Add the Wishlist Button: Open a Product template, click Add block, and select Wishlist Button. Place it near the Add to cart button for the best shopping experience.
- 💾 Save Your Changes: Click Save to publish the changes to your storefront.
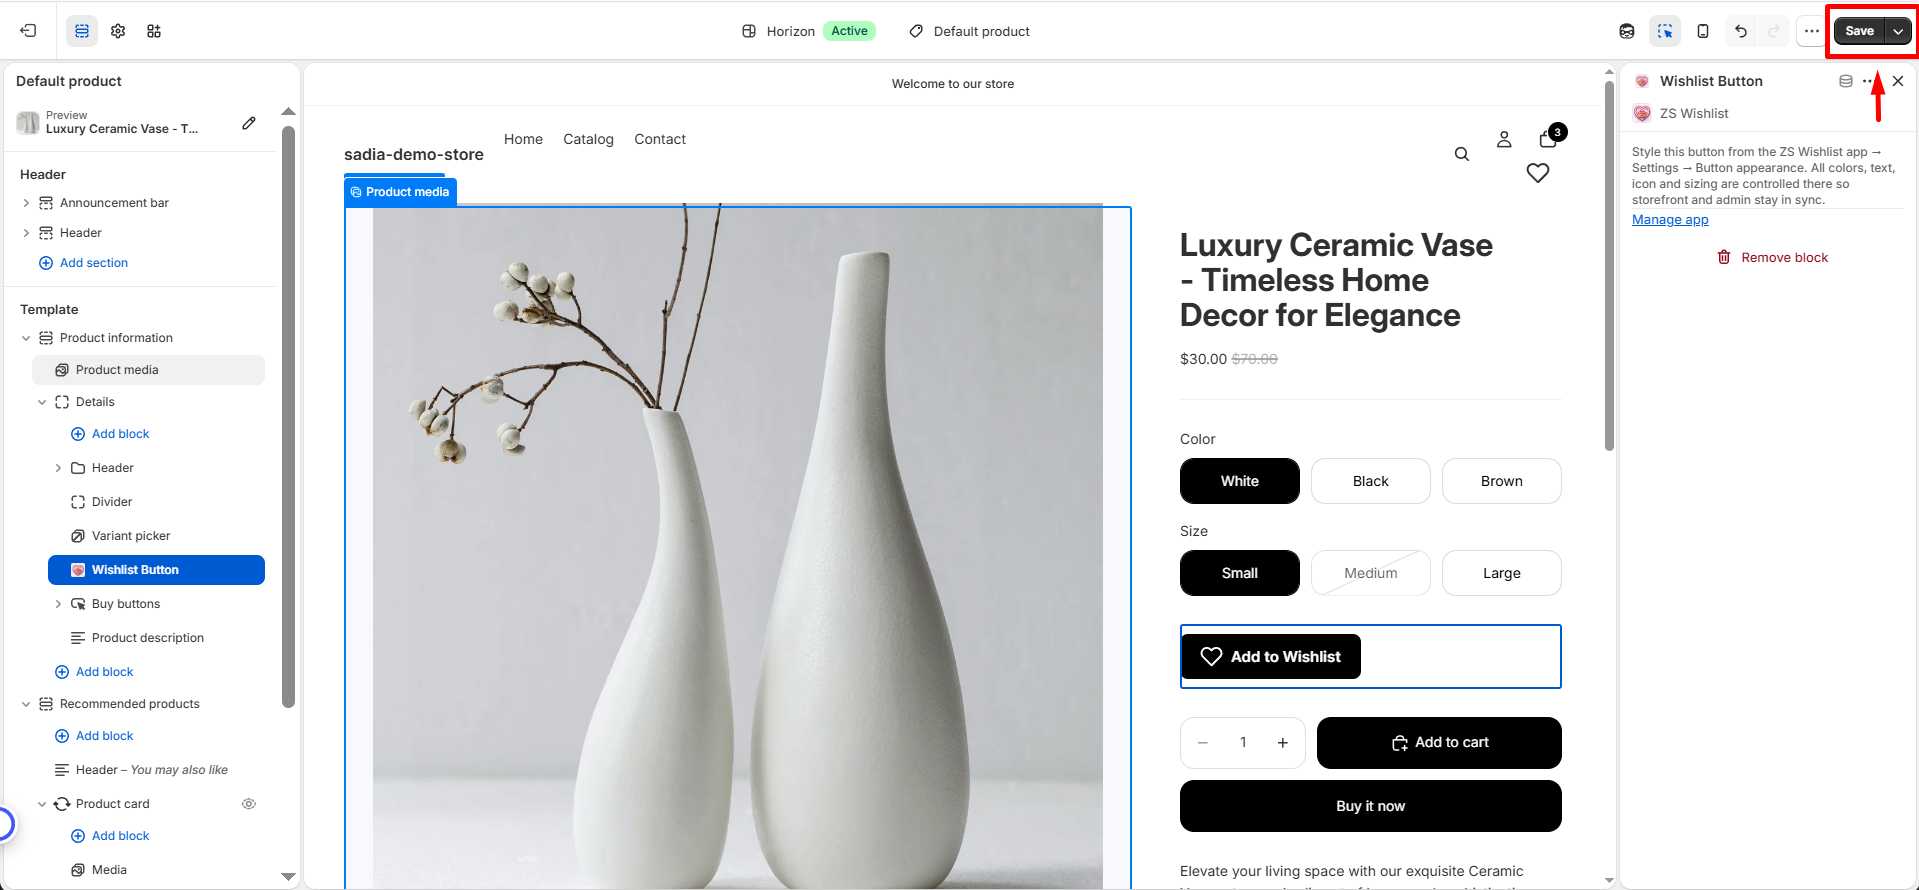
💡 Pro Tip: Position the wishlist button next to the Add to cart button. It's one of the first places shoppers look, helping increase engagement and wishlist saves.
🧡 Wishlist page
Give your shoppers a dedicated space to view all their saved products. The Wishlist Page helps improve engagement and makes it easy for customers to return to their favorite items.
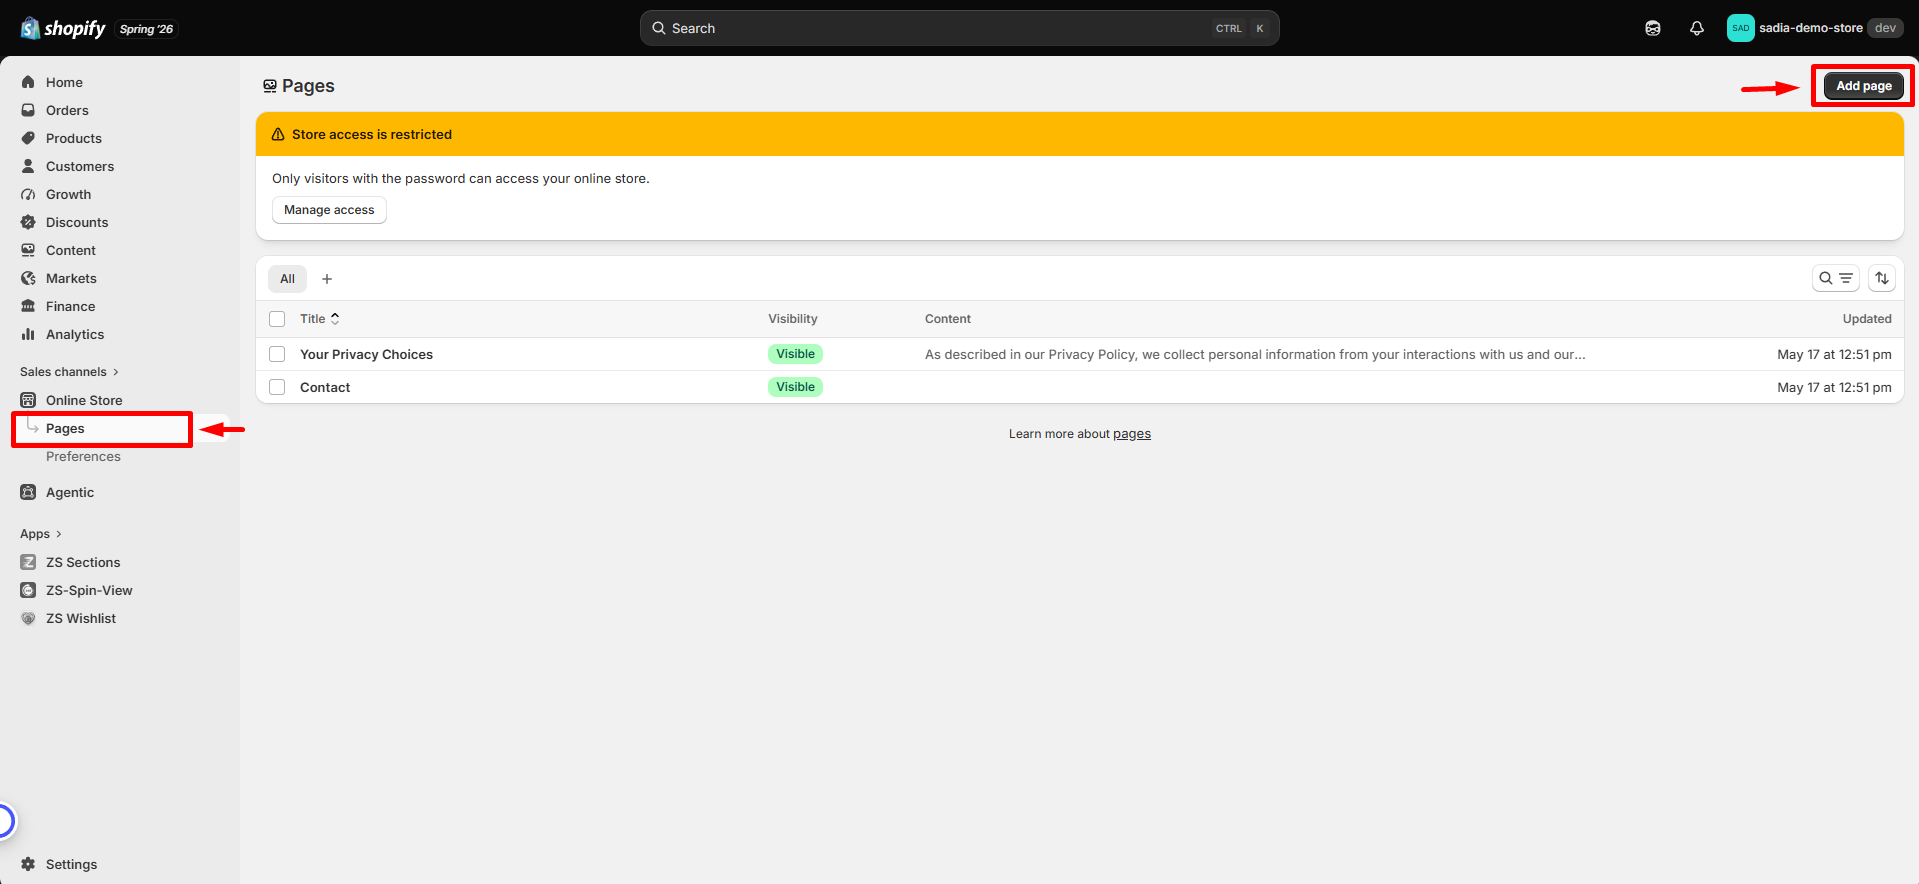
- 📝 Create a Wishlist Page: Go to Online Store → Pages → Add page, then title it Wishlist.
- 🎨 Add the Wishlist Block: In the Theme Editor, open the Wishlist page template, then add the Wishlist Page block.
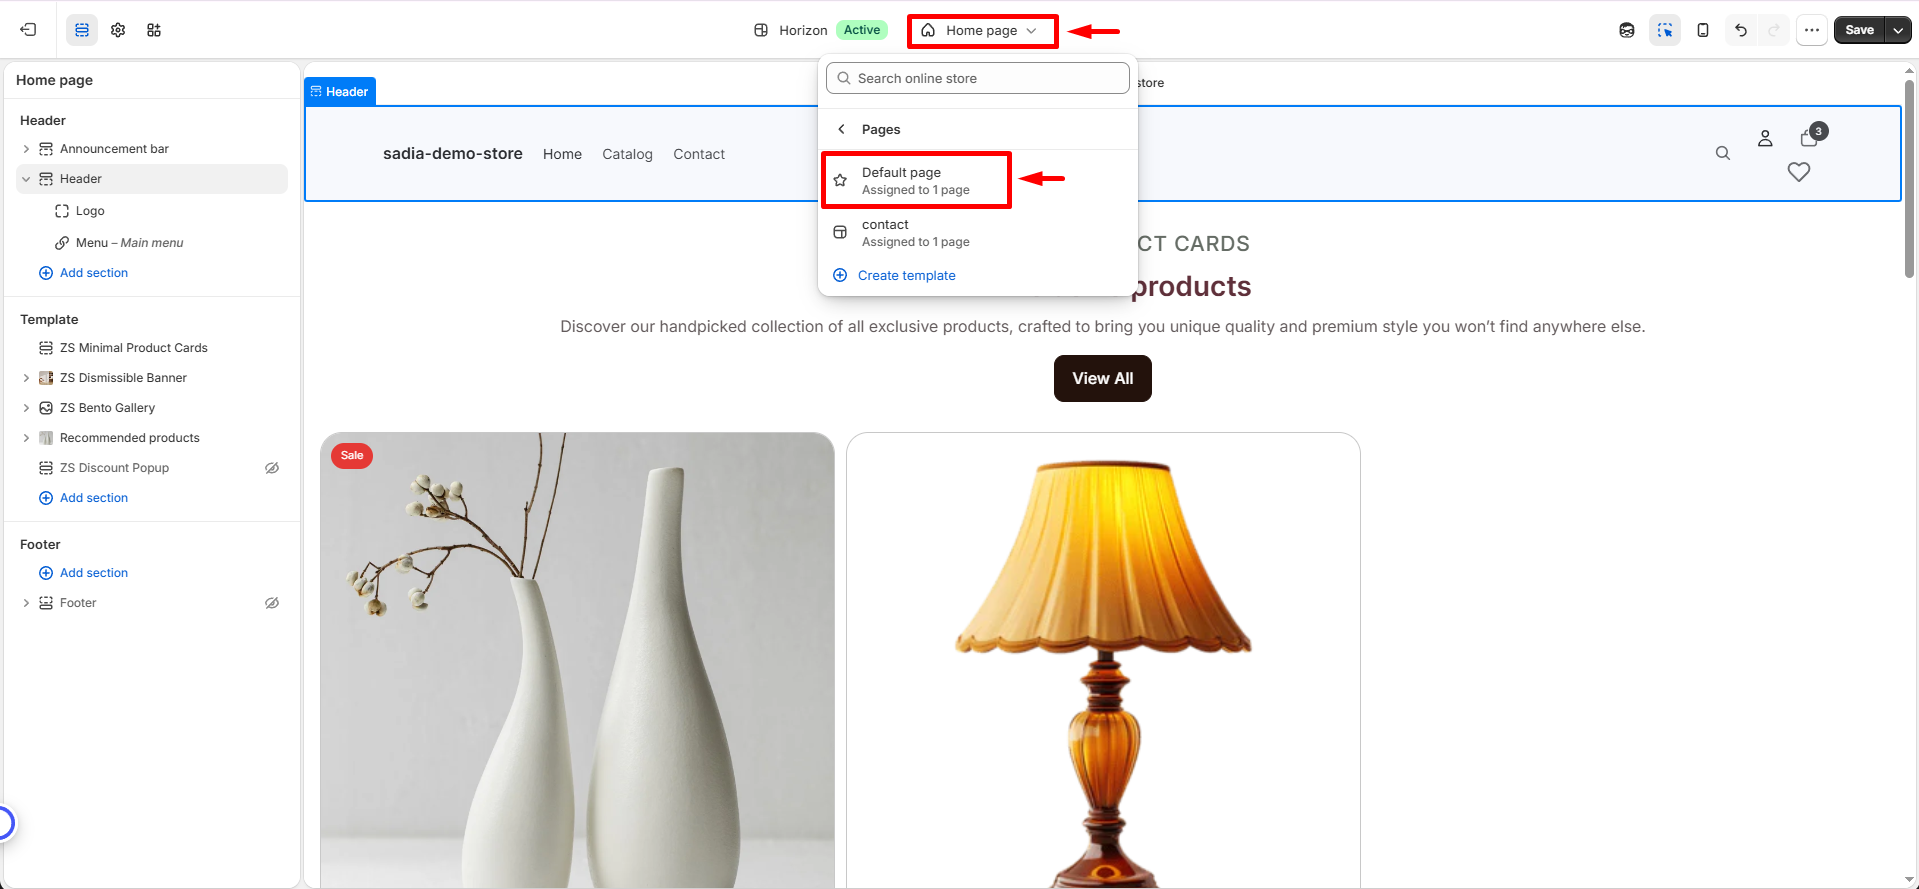
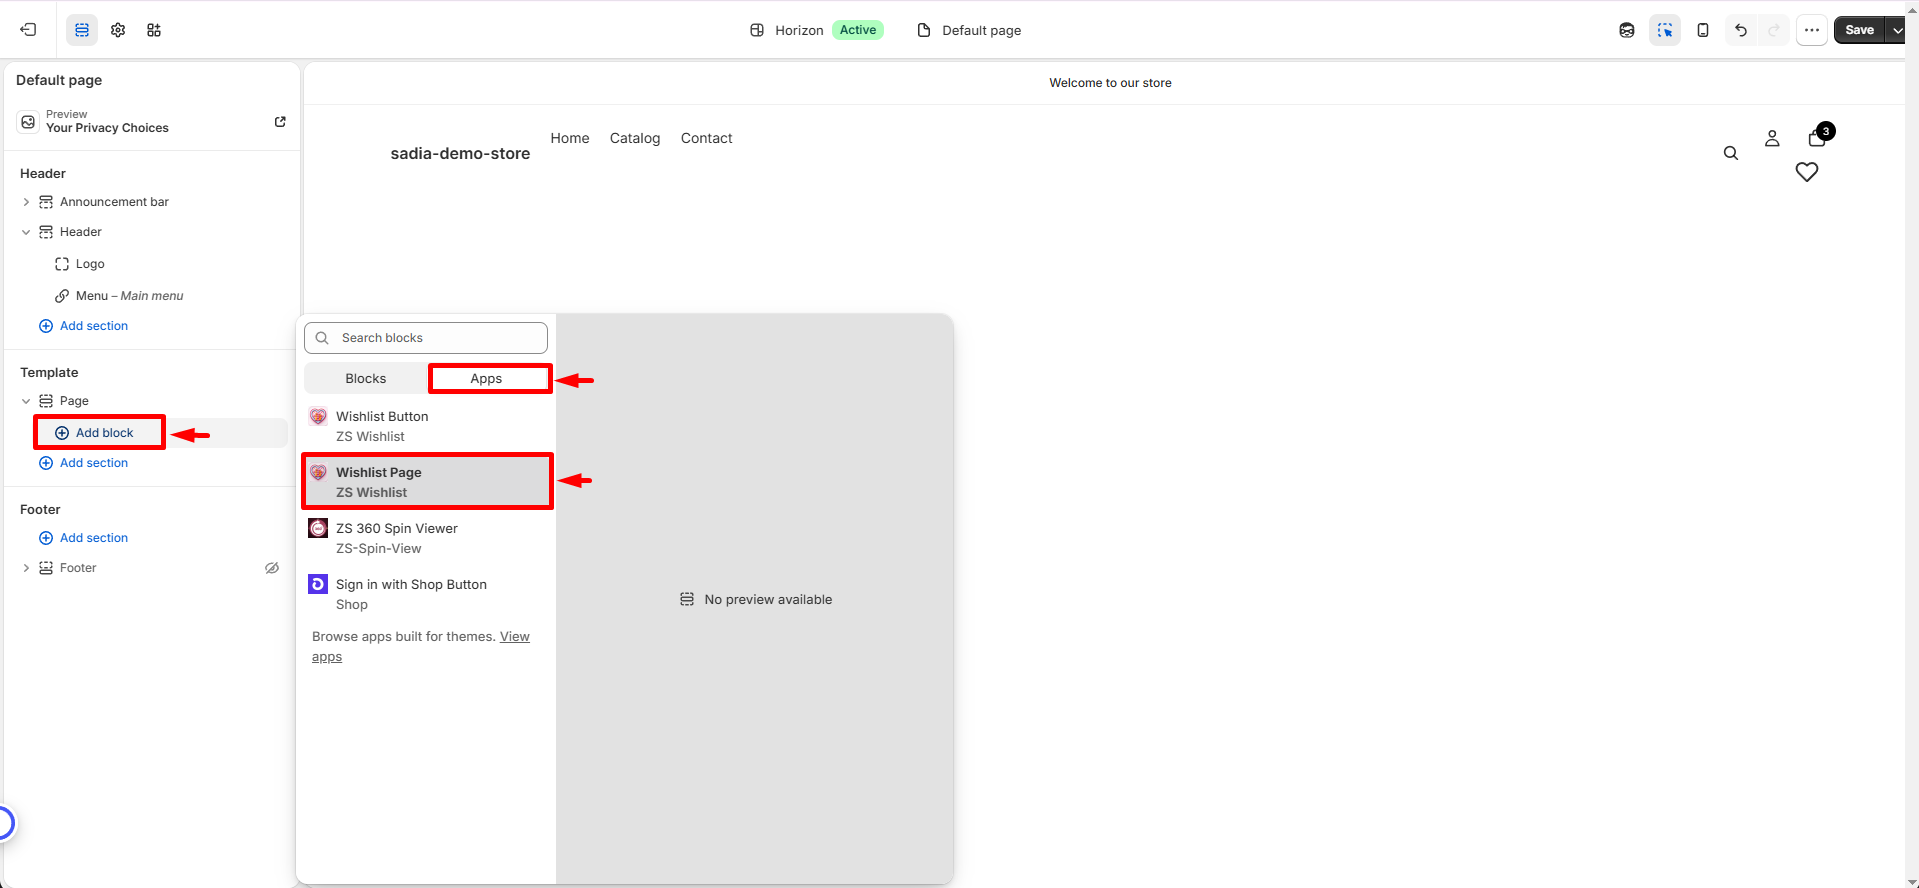
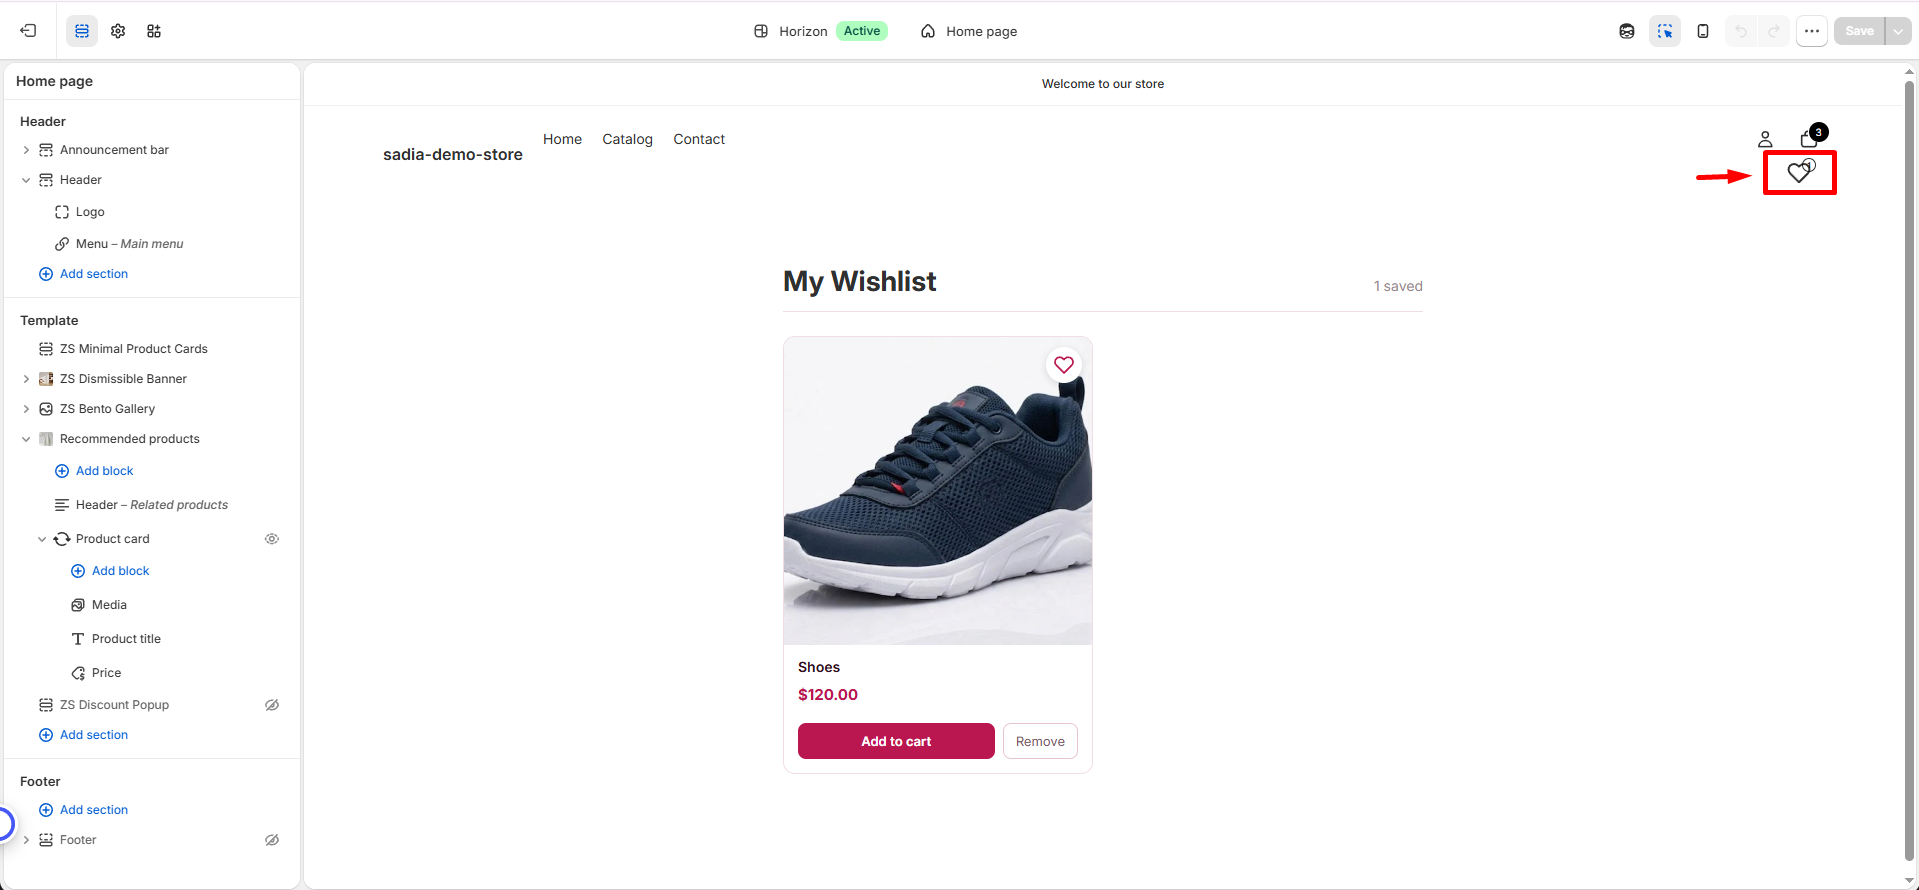
- 🔗 Connect the Page Link: The Wishlist Header Icon is usually connected automatically. If it is not linked, go to the Wishlist Header Icon settings and select your Wishlist page or enter the page URL:
/pages/wishlist. - 🛒 Access Wishlist Features: Once the Wishlist setup is complete, shoppers can use the header icon to open their wishlist, view saved items, add products to their cart, or remove items.
🎨 Customize the Wishlist Button
Customize the wishlist button to match your store’s style from the app’s Settings page. Changes will appear instantly in the live preview.
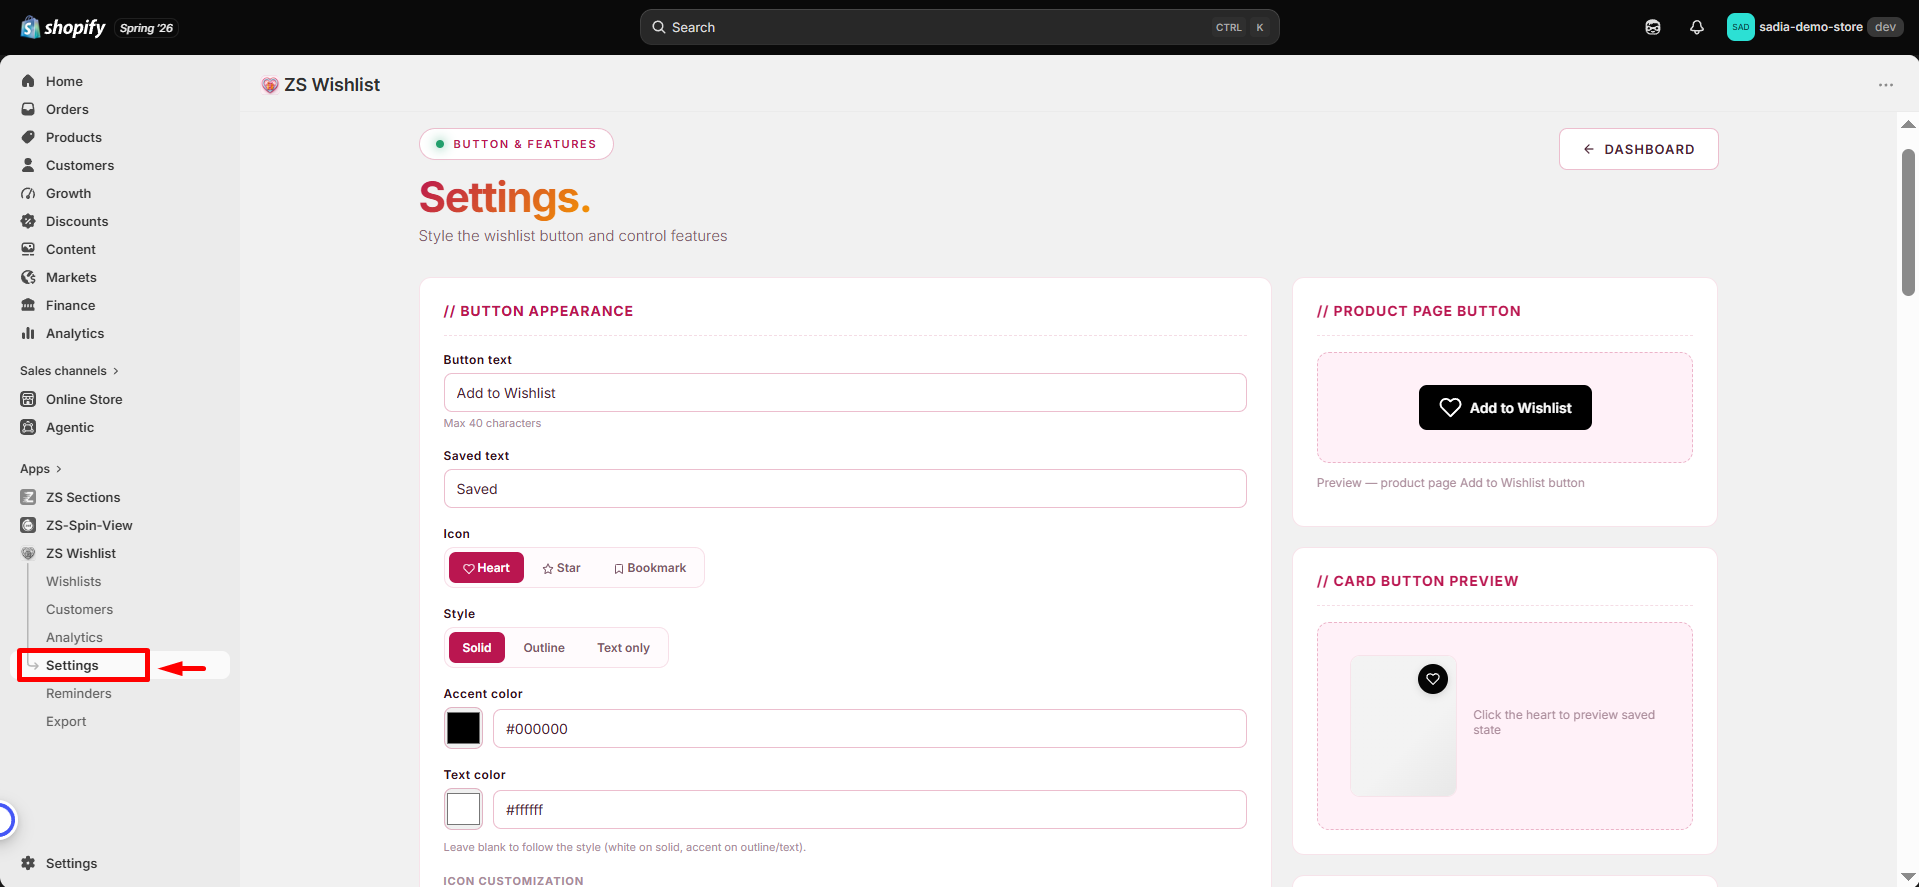
Available customization options:
Button Appearance
- Button Text — Change the label shown on the button, such as “Add to Wishlist” or “Save for Later”.
- Icon — Choose your preferred icon, such as a heart, star, or bookmark.
- Button Style — Select a style that fits your store: solid, outline, or text-only.
- Button Color — Set a custom color using a hex code to match your brand.
- Custom SVG Icon - Replace the default icon with your own SVG icon.
- Icon & Button Styling -Adjust the icon size, stroke thickness, button spacing, border radius, background color, border visibility, and saved state color to match your store’s design.
Product Page Placement
- Button Placement —Choose where the wishlist button appears: next to the Add to Cart button, below the product price, or on the product image.
Product Card Button
- Icon & Appearance - Choose the icon style (Heart, Star, or Bookmark), customize the icon color, add a custom SVG icon, and adjust the icon size.
- Button Layout & Style - Control the button size, padding, border radius, background color, and border visibility.
- Position - Choose where the wishlist button appears on the product card, such as the top right corner.
- Saved State Colors - Customize the icon and background colors when a product has been added to the wishlist.
👤 Guest Wishlists
Allow shoppers to save items to their wishlist without logging in. Guest wishlists are stored securely in the browser and linked to an anonymous identifier.
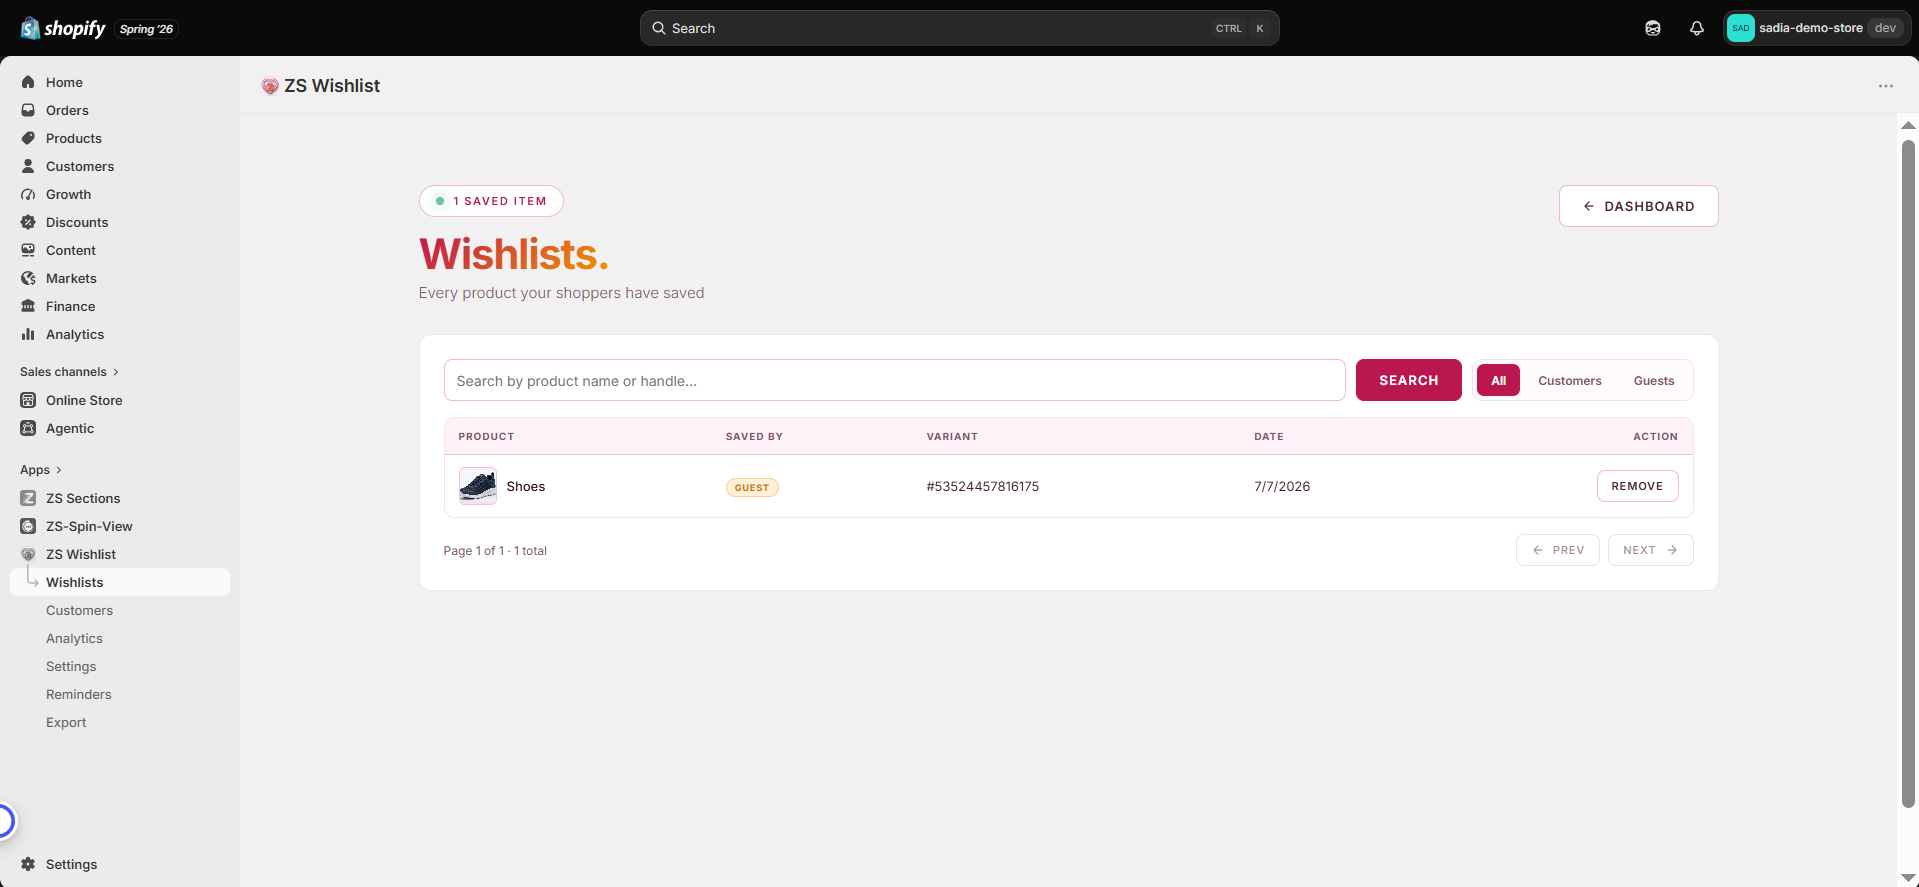
When a guest shopper later logs in, their saved items are automatically merged into their customer account, so nothing is lost. You can enable or disable guest wishlists anytime from the app’s Settings page based on your store’s requirements.
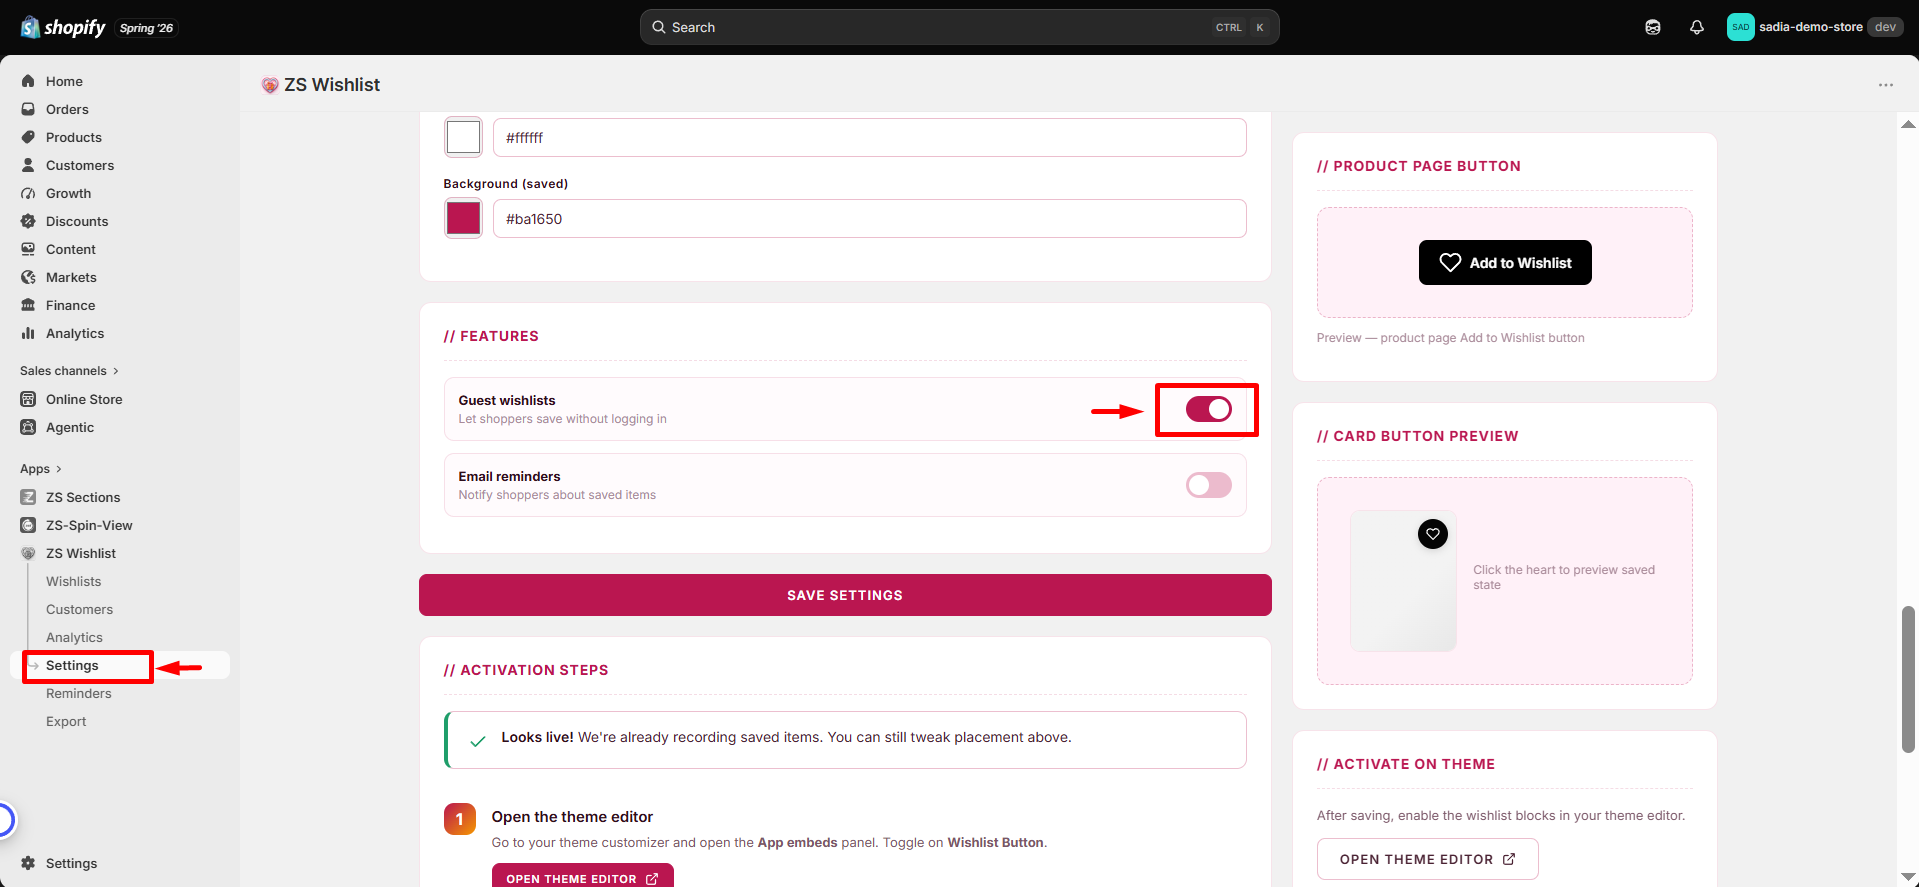
Guest wishlists help you capture shoppers who are not ready to create an account yet, allowing them to save products and return when they are ready to purchase.
👥 Customers
Track shoppers who have saved products to their wishlist. This page displays customers who have added at least one product to their wishlist, along with their wishlist activity.
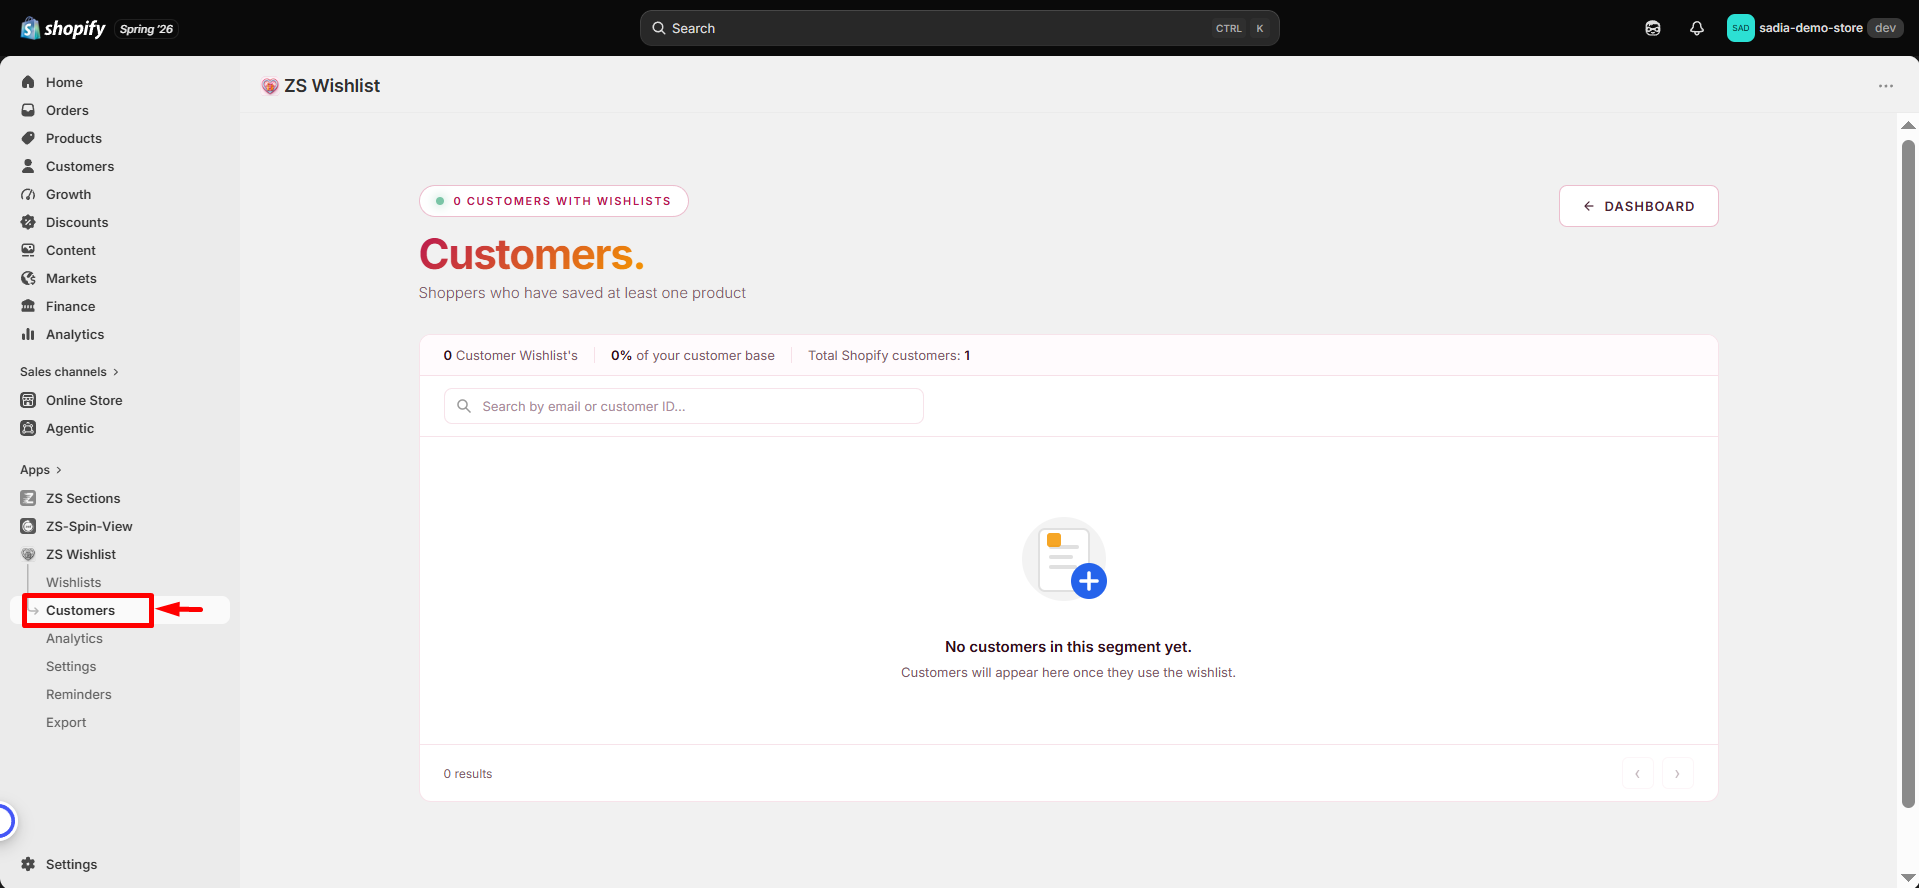
The dashboard shows the number of customers with wishlists, the percentage of your total customer base, and the total number of Shopify customers.
You can search customers by email or customer ID to quickly find specific wishlist users.
If no customers are shown, it means no shoppers have used the wishlist feature yet. Customers will automatically appear here once they save products to their wishlist.
✉️ Email Reminders
Bring shoppers back to your store by sending them personalized emails about the products they have saved. Email reminders are available on the Starter plan and above.
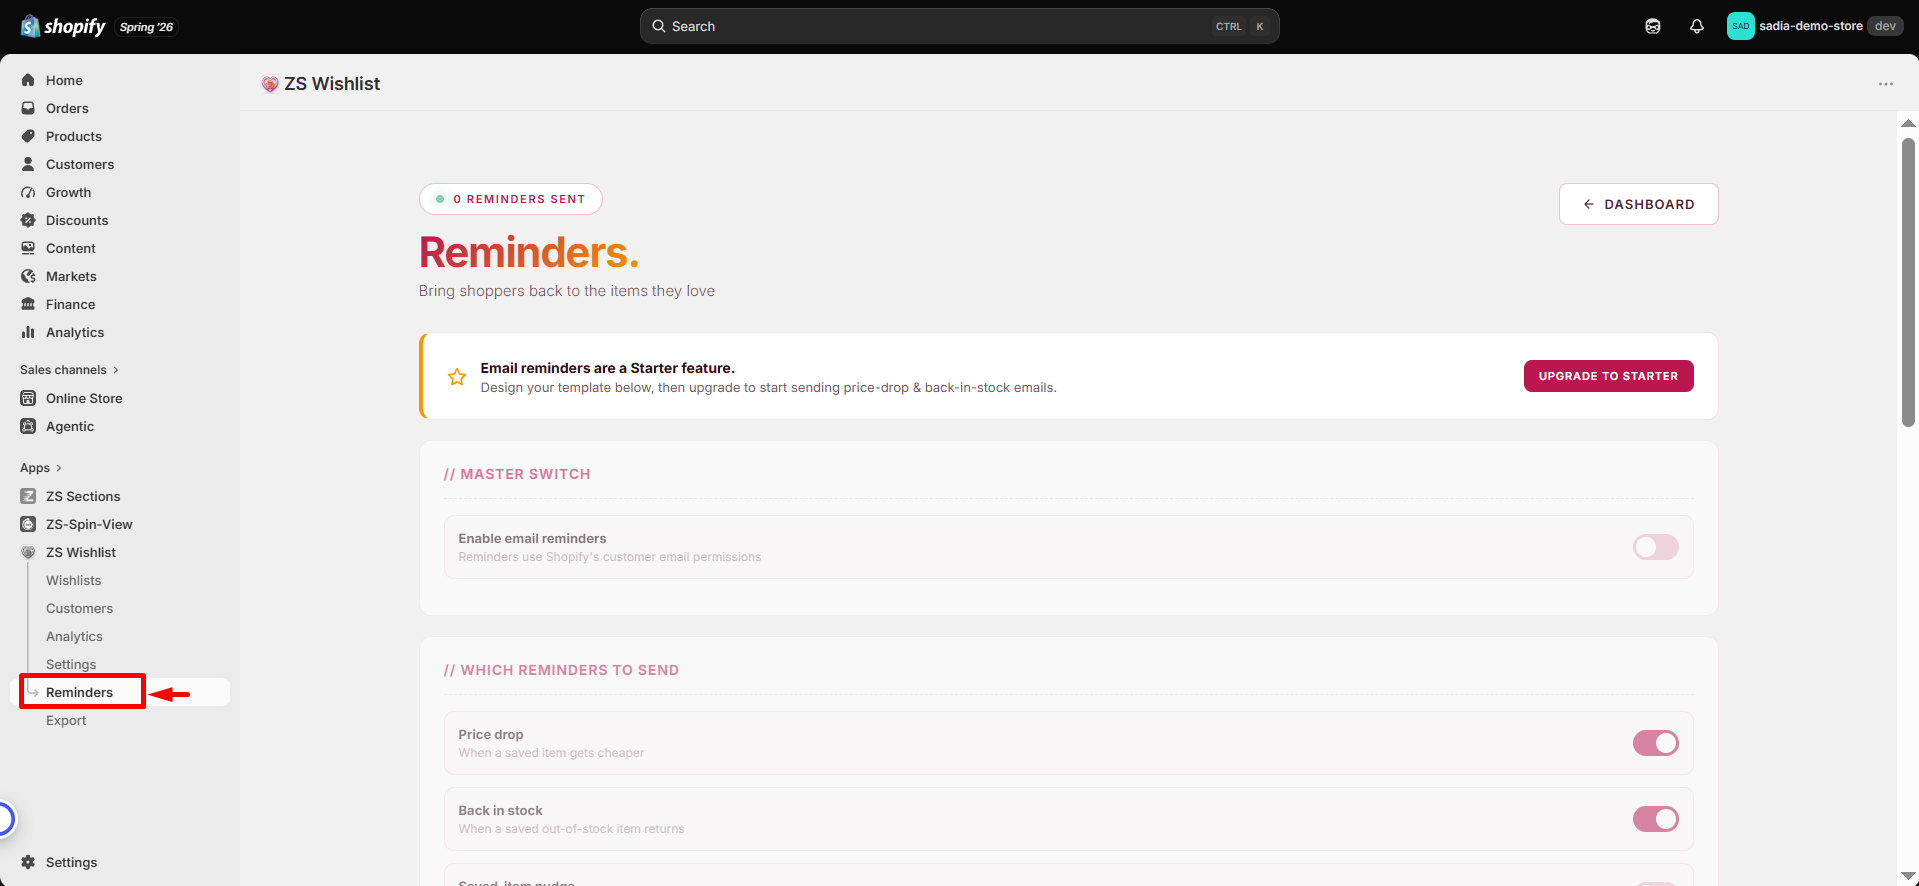
Reminder types
- Price drop — Notify shoppers when the price of a saved item decreases.
- Back in stock — Let shoppers know when a previously unavailable saved item becomes available again.
- Saved Item Reminder — Send a gentle reminder after a selected number of days to encourage shoppers to revisit their saved products.
Design Your Emails
Create beautiful reminder emails using the built-in template editor. Customize your emails by adding headings, text, product lists, buttons, and more using the drag-and-drop blocks. For advanced customization, switch to code mode and edit the HTML directly.
Personalize emails using dynamic variables to display shopper and product information automatically.
Every reminder email includes a one-click unsubscribe link to help you stay compliant with email regulations.
📊 Analytics & Export
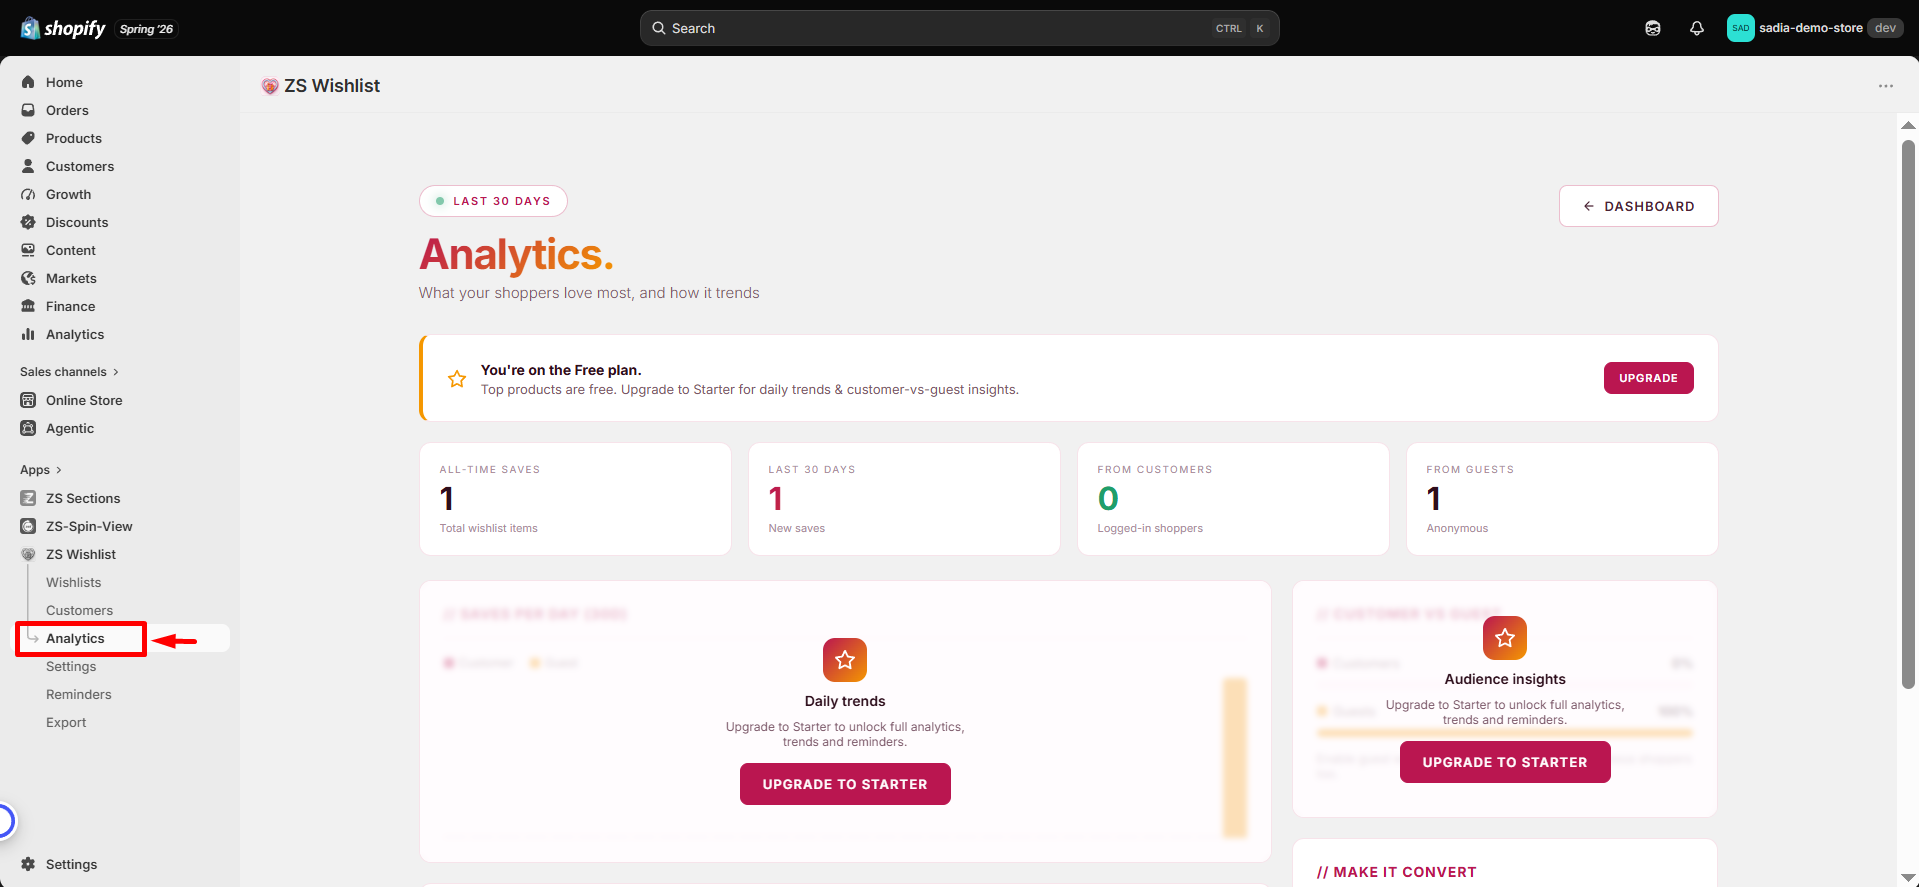
Understand what your shoppers are interested in with detailed wishlist insights. The Analytics page helps you track your most wishlisted products, daily save trends, and the number of guest versus logged-in shoppers.
Export wishlist data as a CSV file from the Export page for further analysis, reporting, or retargeting campaigns.
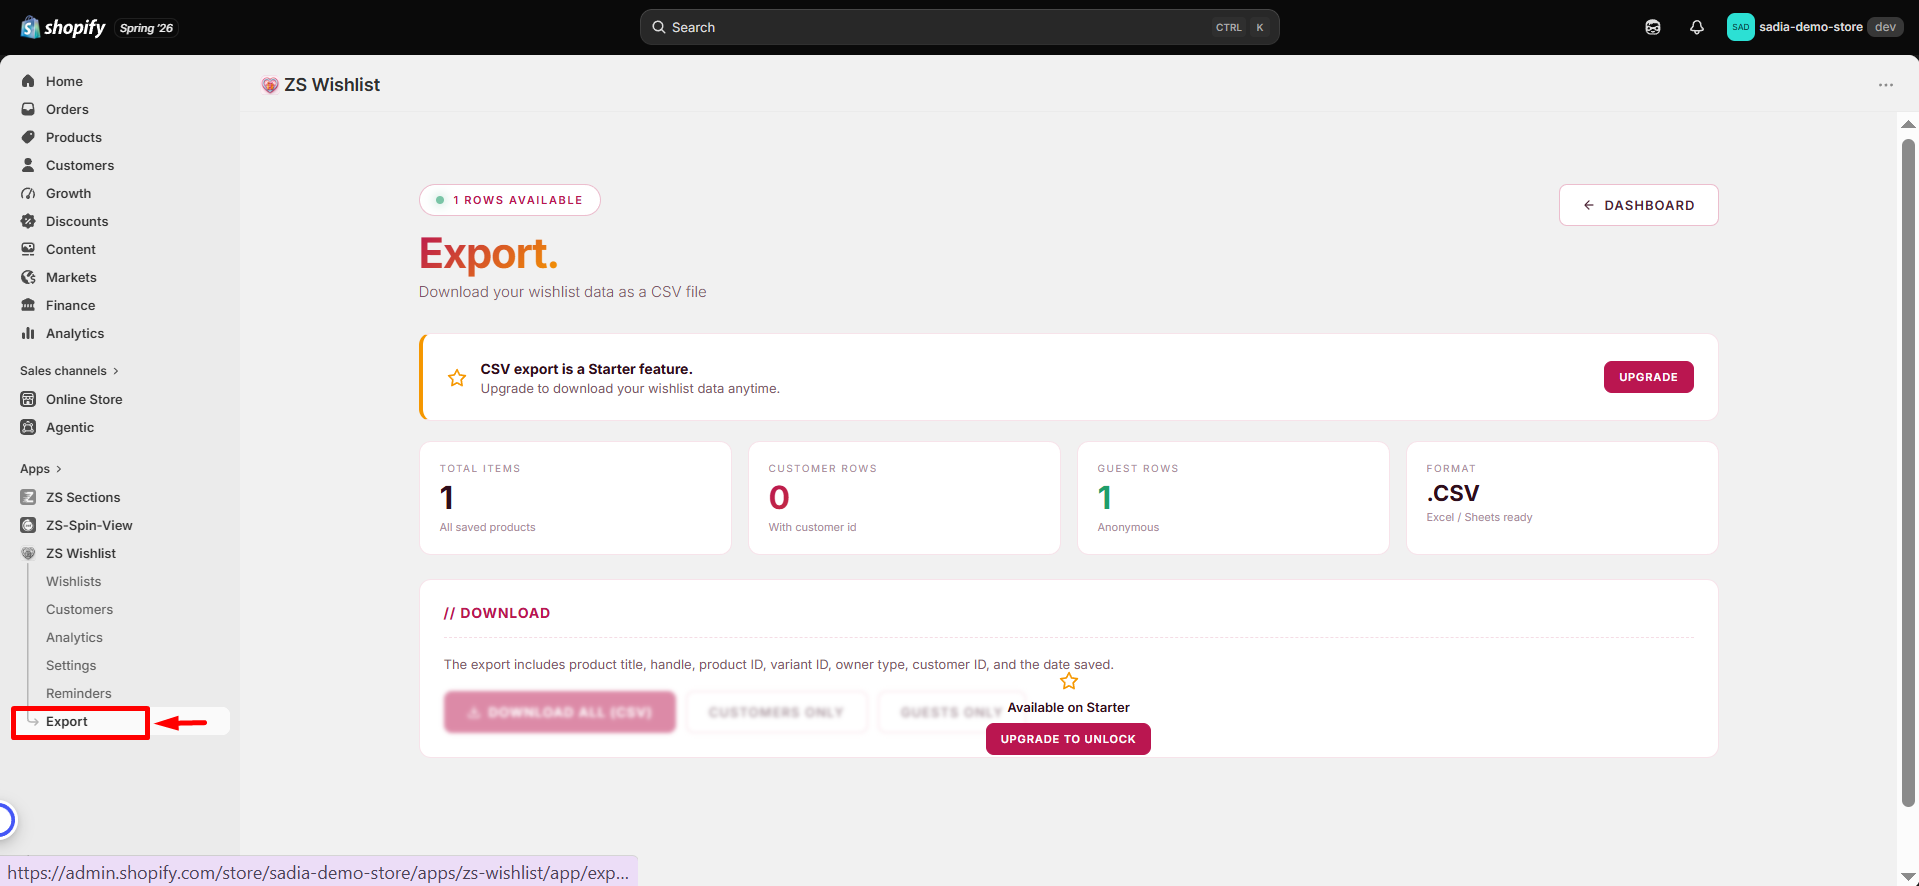
Full analytics and export features are available on the Starter plan and above.
💳 Plans & Billing
Start for free and upgrade whenever you need more features. All billing is securely handled through Shopify and will appear on your regular Shopify invoice.
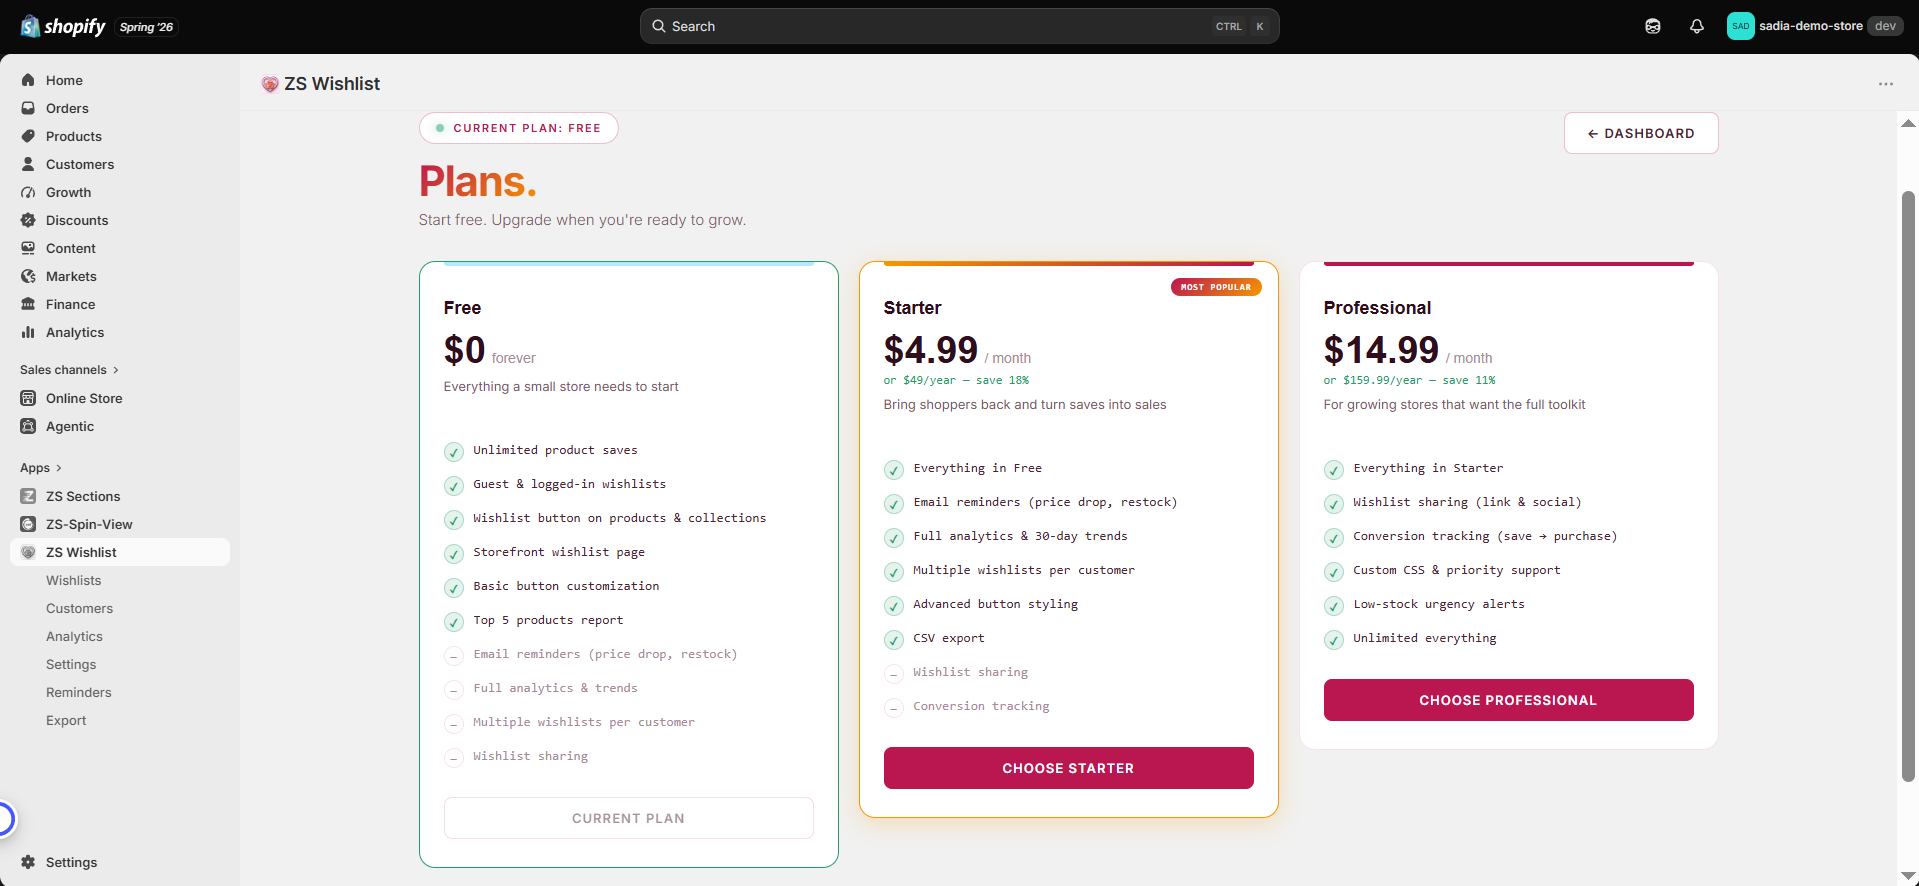
- Free Plan — Includes unlimited wishlist saves, guest and customer wishlists, button customization, and top products reports.
- Starter Plan — $4.99/month — Includes everything in the Free plan, plus email reminders, full analytics, and CSV export.
- Professional Plan — $14.99/month — Includes everything in the Starter plan, plus wishlist sharing, conversion tracking, and custom CSS support.
All paid plans include a 14-day free trial. You can upgrade, change, or cancel your plan anytime from the app’s Plans page.
💬 FAQ
Does it work with my theme?
Yes. ZS Wishlist works with any Shopify theme through app blocks and app embeds — no theme code editing required.
Is the free plan really free?
Yes. The Free plan has no time limit and no hidden fees. Unlimited saves, guest and customer wishlists, and button customization are all included.
What happens to a guest's wishlist when they log in?
It merges automatically into their customer account. Items they saved as a guest carry over the moment they log in — nothing is lost.
How are reminder emails sent?
Reminders are sent automatically when a saved item drops in price or returns to stock. Every email includes an unsubscribe link, and shoppers who opt out never receive another.
Can I cancel anytime?
Yes. Change or cancel your plan anytime from the Plans page. Billing is prorated through Shopify.